How to perform Database Test Automation with Playwright and Postgresql?

When automating test scenarios, it's important to validate how the data is being stored, processed and retrieved. This ensures data integrity, guaranteeing the application's overall functionality and user experience remain reliable. In this blog we will learn how to set up and add database validations in your test scripts developed with Playwright. In this blog the focus will be on Postgres set up, necessary libraries and code snippets that need to be added within your test scripts.

What is Playwright?
Playwright is an open source framework for testing web applications. It's used to automate browser interactions and testing your web applications across multiple browsers. You can build robust automation frameworks using Playwright.
What is Postgresql?
PostgreSQL (Postgres) is a free, open-source database management system (RDBMS). It's an object-relational database that uses Structured Query Language (SQL) for queries and transactions.
How can Database Integration help improve test automation?
Database integration will help improve the test automation in multiple ways -
- Backend validations to ensure data integrity for end to end tests.
- Query the database to get specific information, to continue execution of the front end tests.
- Prepare data before test execution to save test execution time and improve test automation stability.
- Purge data post test execution to reduce test flakiness.
- Manipulate or update data, to enable component level testing with ease.
While scripting UI tests, one question we should always ask is -
How can I make the test more reliable and stable?
Not all validations or actions need to be performed on the UI, some of them can be easily achieved through database integrations which help improve the stability, speed of execution and reliability of the test automation suite.
 Note: Image generated by AI
How to set up postgres within your playwright scripts?
Consider a scenario where after signing up, the user receives a token in an email that needs to be used during the first time they sign in. While automating such scenarios, instead of reading the email every time, we can fetch the token directly from the database - this makes the test faster and reliable since we do not have to wait for the email to arrive at the user’s inbox and we do not have to parse the email body to get token details.
Below is an example of how you can integrate PostgreSQL into your Playwright tests in TypeScript while supporting multiple environments (e.g., local, beta, prod). We'll use the following libraries:
- pg: A PostgreSQL client for Node.js.
- dotenv: Loads environment variables from a file so you can configure different settings per environment.
Below are step-by-step instructions along with sample code.
Learn in detail how to set up playwright.
Postgres and dotenv Installation
In your project root folder execute the following command
npm install pg dotenv
Set Up Environment-Specific Configuration Files
Postgres configurations will be different for different environments. We wouldn't want to create separate modules for each environment. We will be storing the necessary information in .env files and reading the data using the dotenv library.
.env.local
NODE_ENV=local
DB_HOST=localhost
DB_PORT=5432
DB_NAME=localhost_db
DB_USER=local_user
DB_PASSWORD=local_password
.env.beta
NODE_ENV=beta
DB_HOST=beta.sample-app.com
DB_PORT=5432
DB_NAME=beta_db
DB_USER=beta_user
DB_PASSWORD=beta_password
.env.prod
NODE_ENV=prod
DB_HOST=prod.sample-app.com
DB_PORT=5432
DB_NAME=prod_db
DB_USER=prod_user
DB_PASSWORD=prod_password
Create the base module
Within the test automation project's root folder of your playwright scripts - create a folder config and add a file index.ts
Based on the environment details provided at run time during test execution, this module will help identify the right PG database config to be read.
config/index.ts
import * as dotenv from 'dotenv';
import path from 'path';

// Determine the current environment. Default to 'local' if not specified.
const env = process.env.NODE_ENV || 'local';

// Build the path to the correct .env file (e.g., .env.local, .env.beta, .env.prod)
const envFilePath = path.resolve(process.cwd(), `.env.${env}`);
dotenv.config({ path: envFilePath });

// Export the database configuration
export const dbConfig = {
  host: process.env.DB_HOST,
  port: Number(process.env.DB_PORT || 5432),
  database: process.env.DB_NAME,
  user: process.env.DB_USER,
  password: process.env.DB_PASSWORD,
};
Include the Database query within your playwright script
Here's a complete test script in Playwright using Typescript for the scenario mentioned above -
import { test, expect } from '@playwright/test';
import { Client } from 'pg';
import { dbConfig } from '../config';


test('Automate Signup with Token Fetch from Database', async ({ page }) => {


   // Create a new PostgreSQL client using the configuration
   const client = new Client(dbConfig);


   // Perform sign up
   await page.goto('https://appurl/login');
   await page.getByRole('link', { name: 'Join free today' }).click();
   await page.getByPlaceholder('Enter your email').click();
   await page.getByPlaceholder('Enter your email').fill('[email protected]');
   await page.getByPlaceholder('Enter your name').click();
   await page.getByPlaceholder('Enter your name').fill('This is a test - Please ignore');
   await page.getByPlaceholder('Enter your password', { exact: true }).click();
   await page.getByPlaceholder('Enter your password', { exact: true }).fill('password');
   await page.getByPlaceholder('Enter your password again').click();
   await page.getByPlaceholder('Enter your password again').fill('password');
   await page.getByRole('button', { name: 'Sign Up' }).click();


   try{
       // Connect to the database
       await client.connect();


       // Execute a query
       const result = await client.query('SELECT token FROM your_table');


       if (result.rows.length > 0) {
           console.log('Token:', result.rows[0].token);

           // Use the token to sign in
           await page.goto('https://appurl/login?token=?' + result.rows[0].token);


           // Validate user signed in
           await expect(page).toHaveTitle('Welcome');


       } else {


           // throw error if token not found
           console.log('No token found in the query result.');
           throw new Error('No token found in the query result.');
       }
   } finally {
       // Ensure the client disconnects even if an error occurs
       await client.end();
   }
});
Explanation
const client = new Client(dbConfig);
Creates a new client using the configuration.
await client.connect();
Connects to the database.
const result = await client.query('SELECT token FROM your_table');
Executes the query.
result.rows[0].token
Fetches the values from the result set returned by the query.
await client.end();
It is important to always close the connection after test execution, irrespective of the test result.
Test Execution
When running your tests, set the NODE_ENV variable so the correct configuration is loaded. For example:
Local Environment:
NODE_ENV=local npx playwright test
Beta Environment:
NODE_ENV=beta npx playwright test
How DevAssure simplifies integration with PostgreSQL database
What is DevAssure?
DevAssure leverages cutting-edge AI Models and a No-code framework to streamline Web, API, Mobile automation, Database integrations, Accessibility and Visual testing under one unified platform. It has been designed with the specific challenges of modern QA teams in mind, focusing on maximising efficiency, improving Dev/QA productivity, reducing costs, and accelerating time-to-market.
Learn how to onboard onto DevAssure.
Steps to set up postgres with DevAssure across different environments
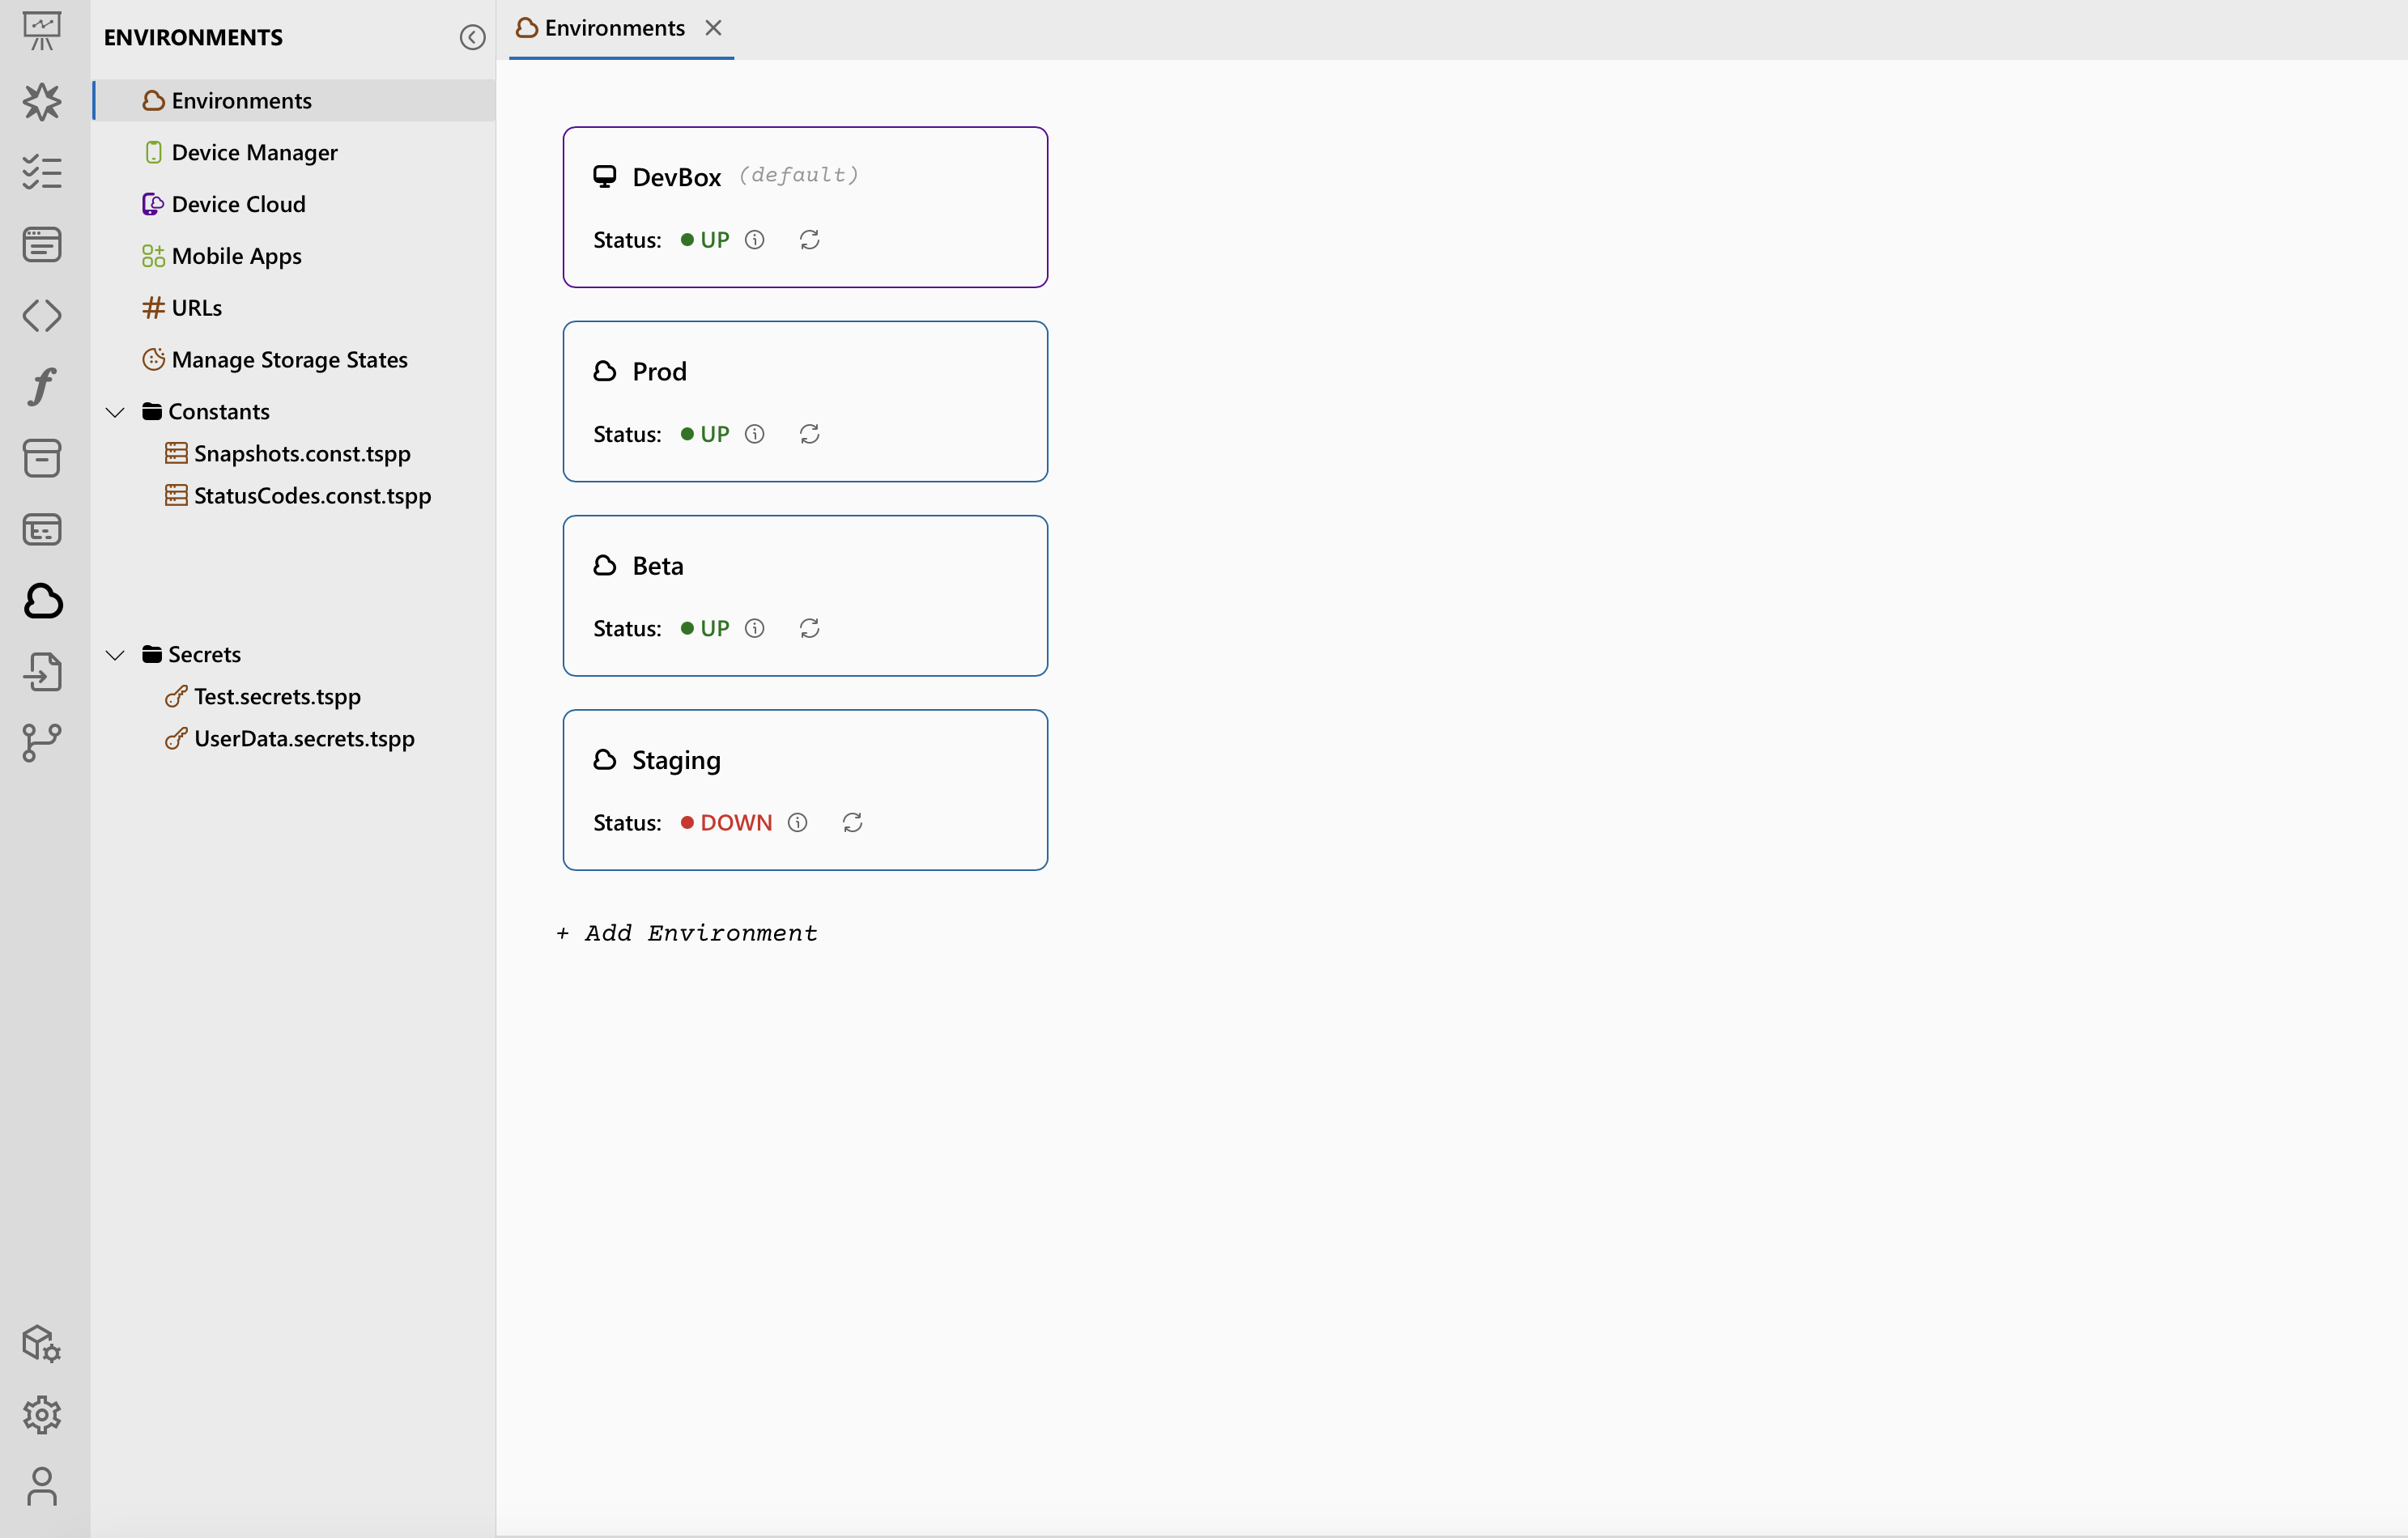
Environment Set up - One time set up
DevAssure provides a neat way with a no code interface to add and manage multiple environments. These environments can be tied to other configurations like Database, Test Data, Application URLs, Test Executions and many other dynamic variables.
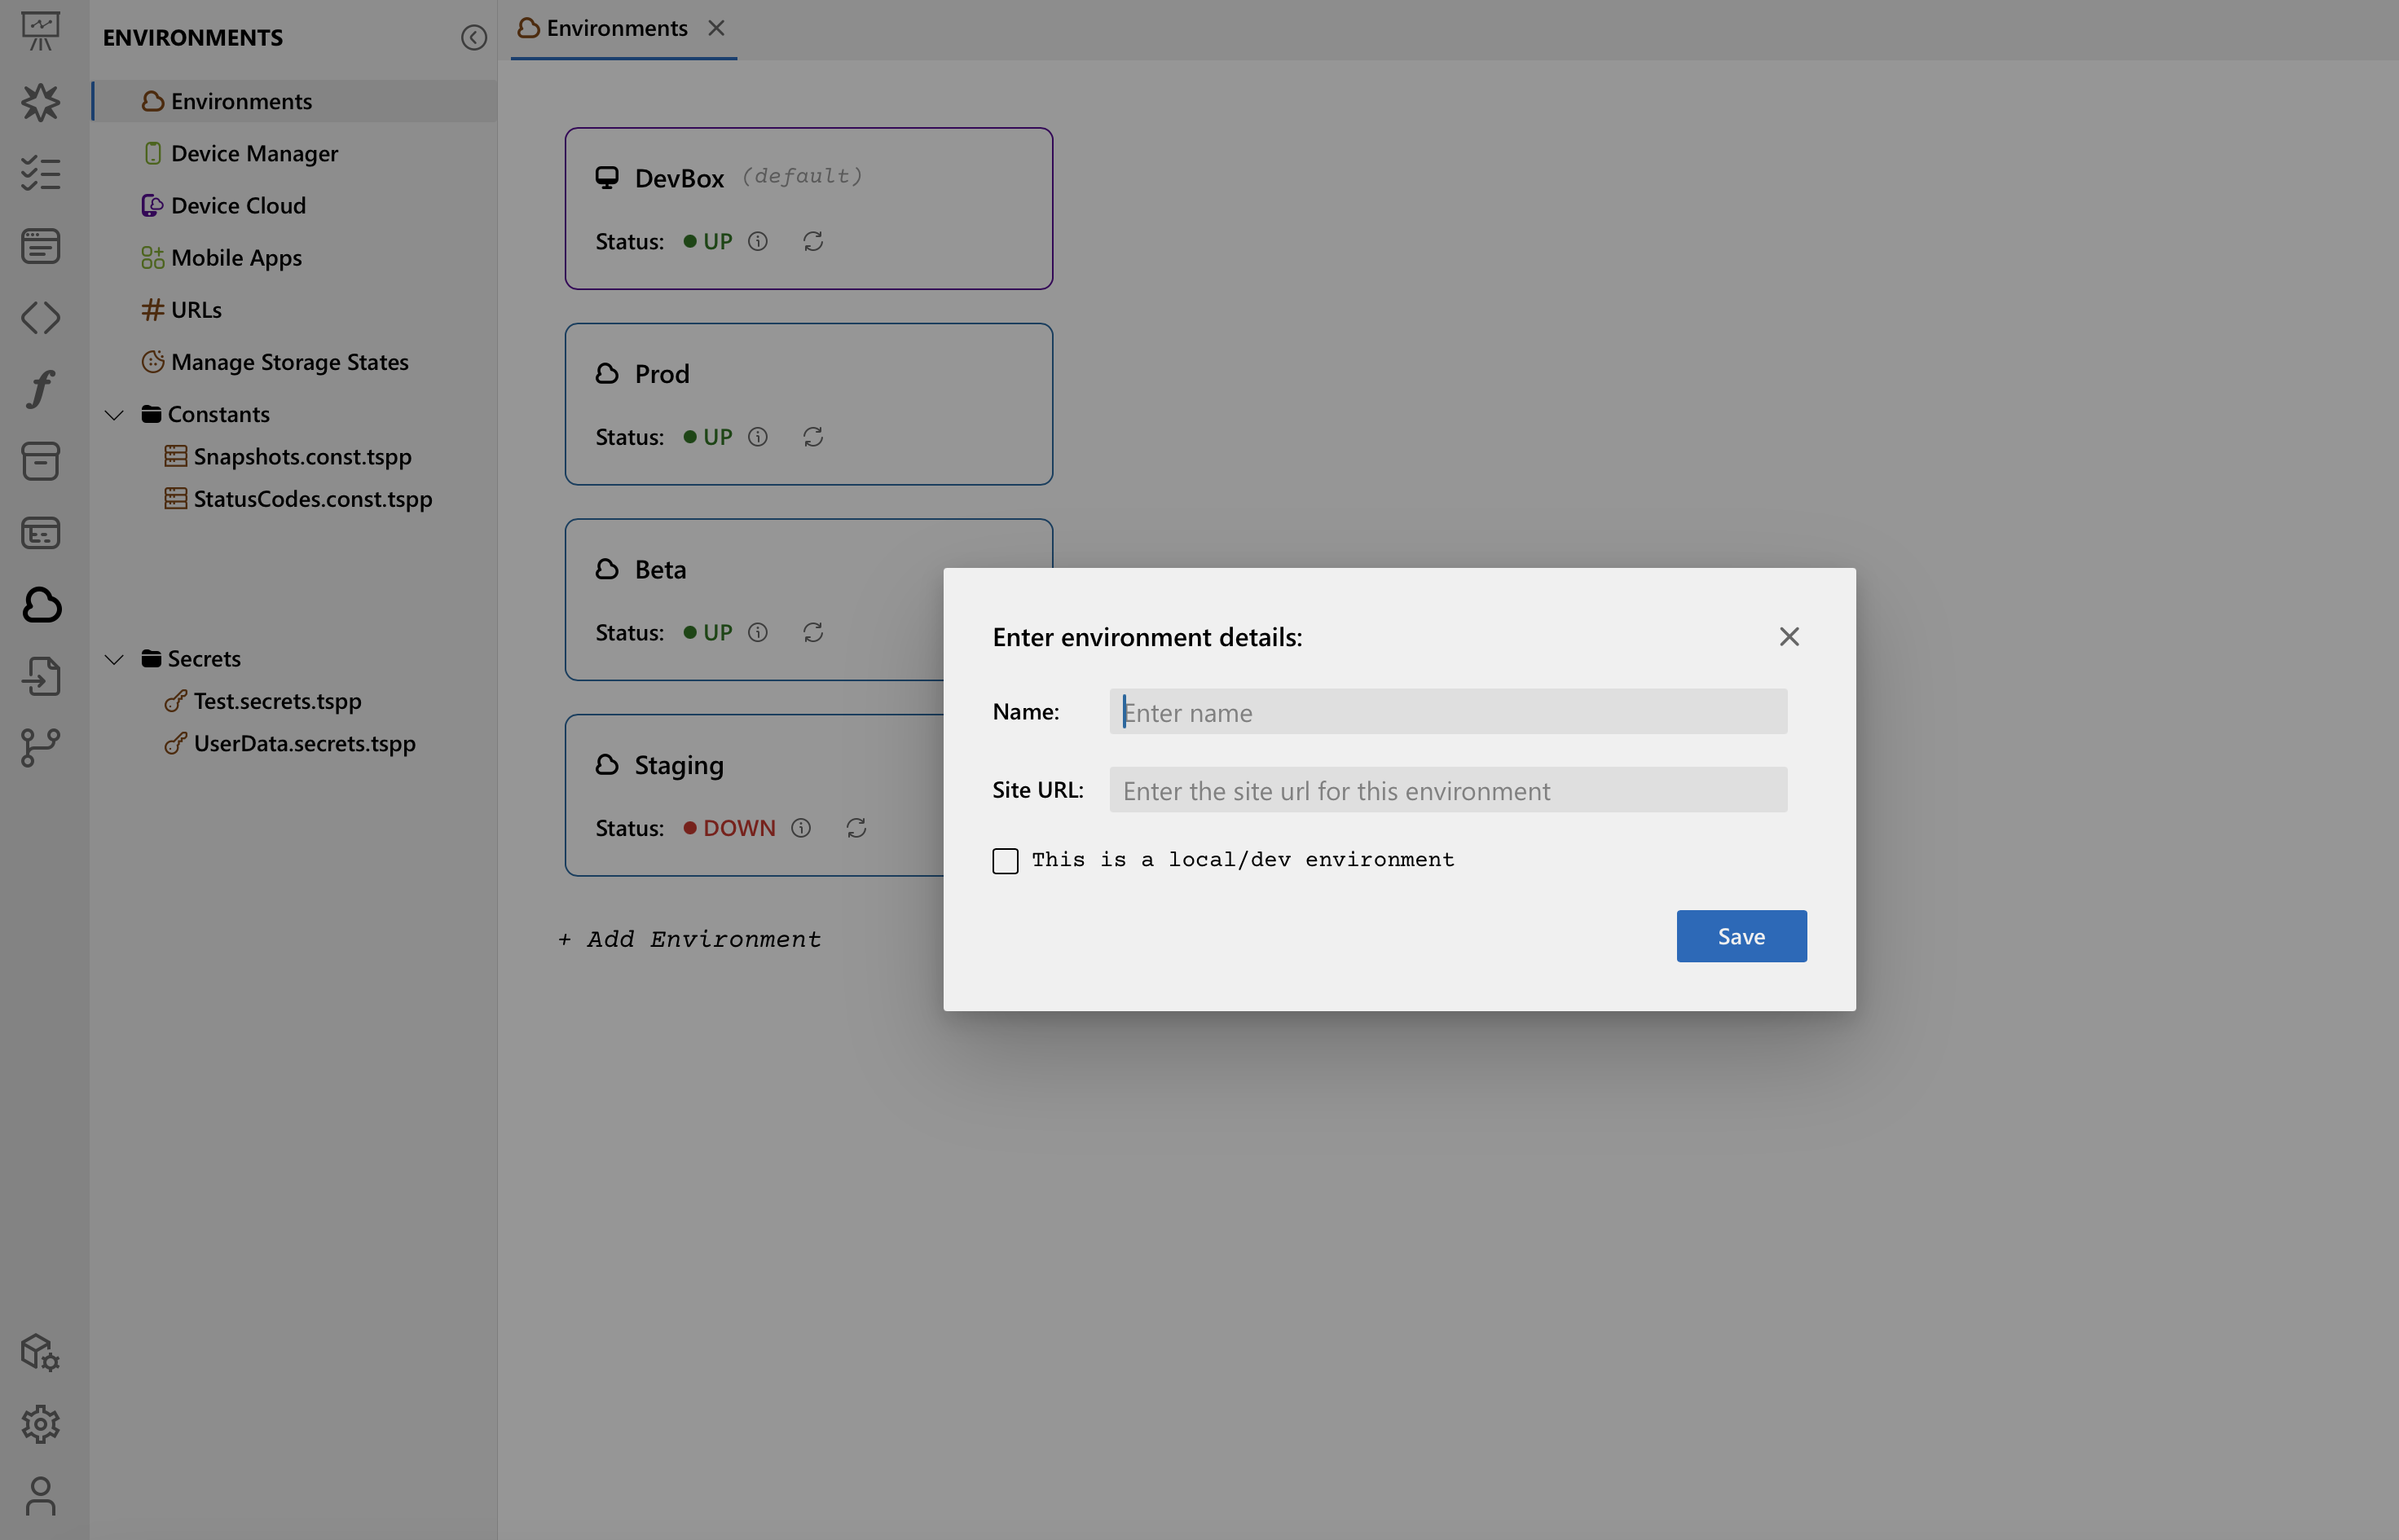
To Create an environment with DevAssure, follow these steps
- Navigate to the Environments section in the sidebar, click on Add Environment .
- Enter the environment details
- Environment Name like local, beta, prod
- Site URL Specify the complete and valid URL for the application under test.
- Click on Save to confirm.
- DevAssure will attempt to validate the endpoint URL and display the status upon successful creation.
Learn more about environment configuration with DevAssure.
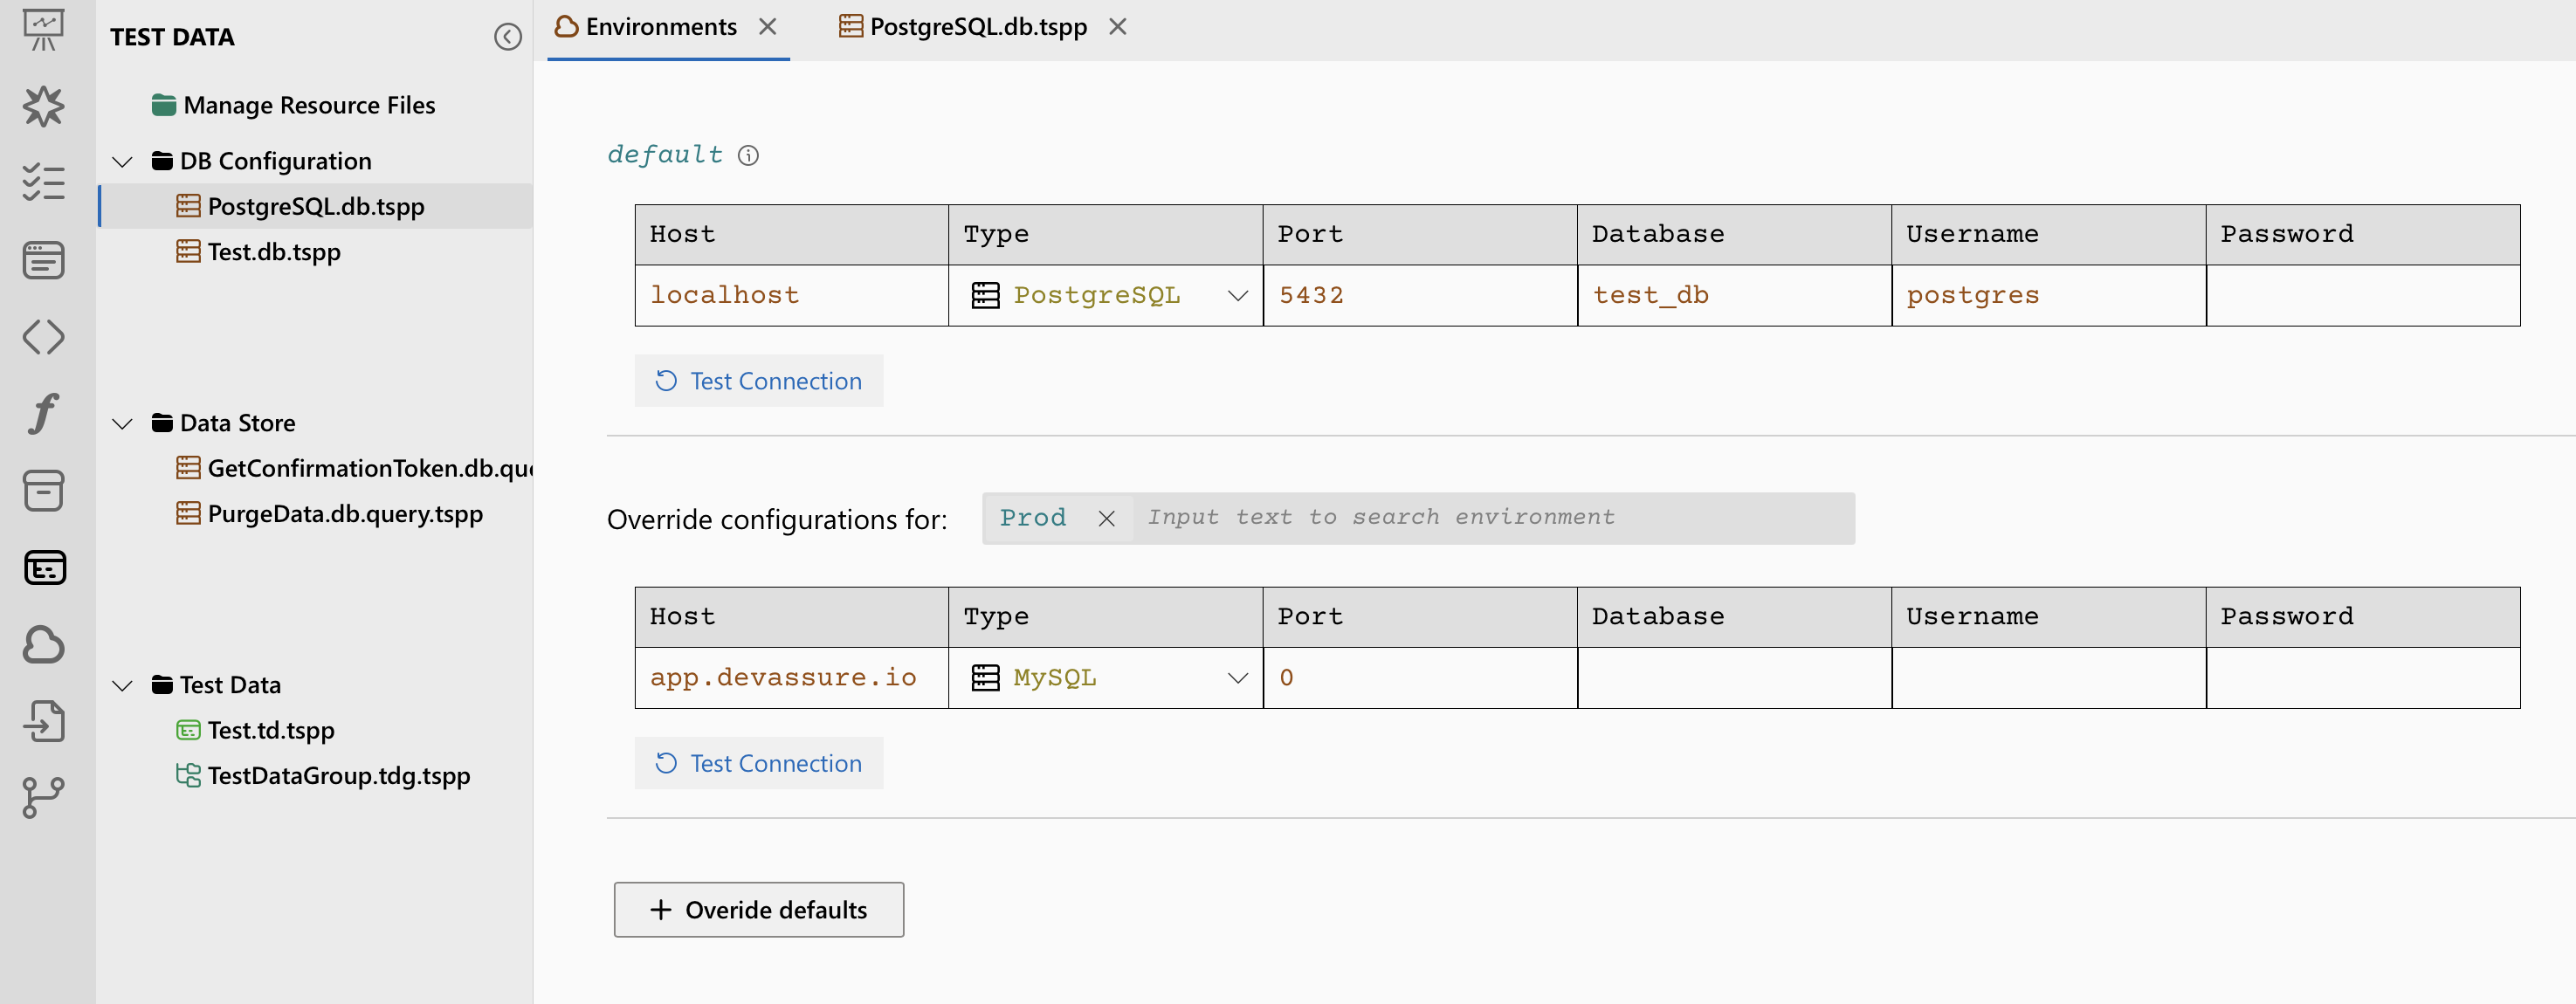
Database Configuration - One time set up
DevAssure provides robust data configuration and management with comprehensive support for Database, Data Store, Test Data and Test Data Group.
Follow the steps below, to create a database config -
- Go to the Test Data section in side navigation.
- Under DB configuration click on Add a new Database Connection.
- Select New Database connection and enter the database connection name.
- The default section defines the database connection used for all environments not explicitly overridden. Configure the connection properties (e.g., PostgreSQL) within this section.
Example
| Host | Type | Port | Database | Username | Password |
|---|---|---|---|---|---|
| localhost | PostgreSQL | 5432 | test | test | test |
- Click on Test Connection to validate the database connection.
- Once the connection is established, the Database queries can be configured.
Learn more about Database Configuration with DevAssure.
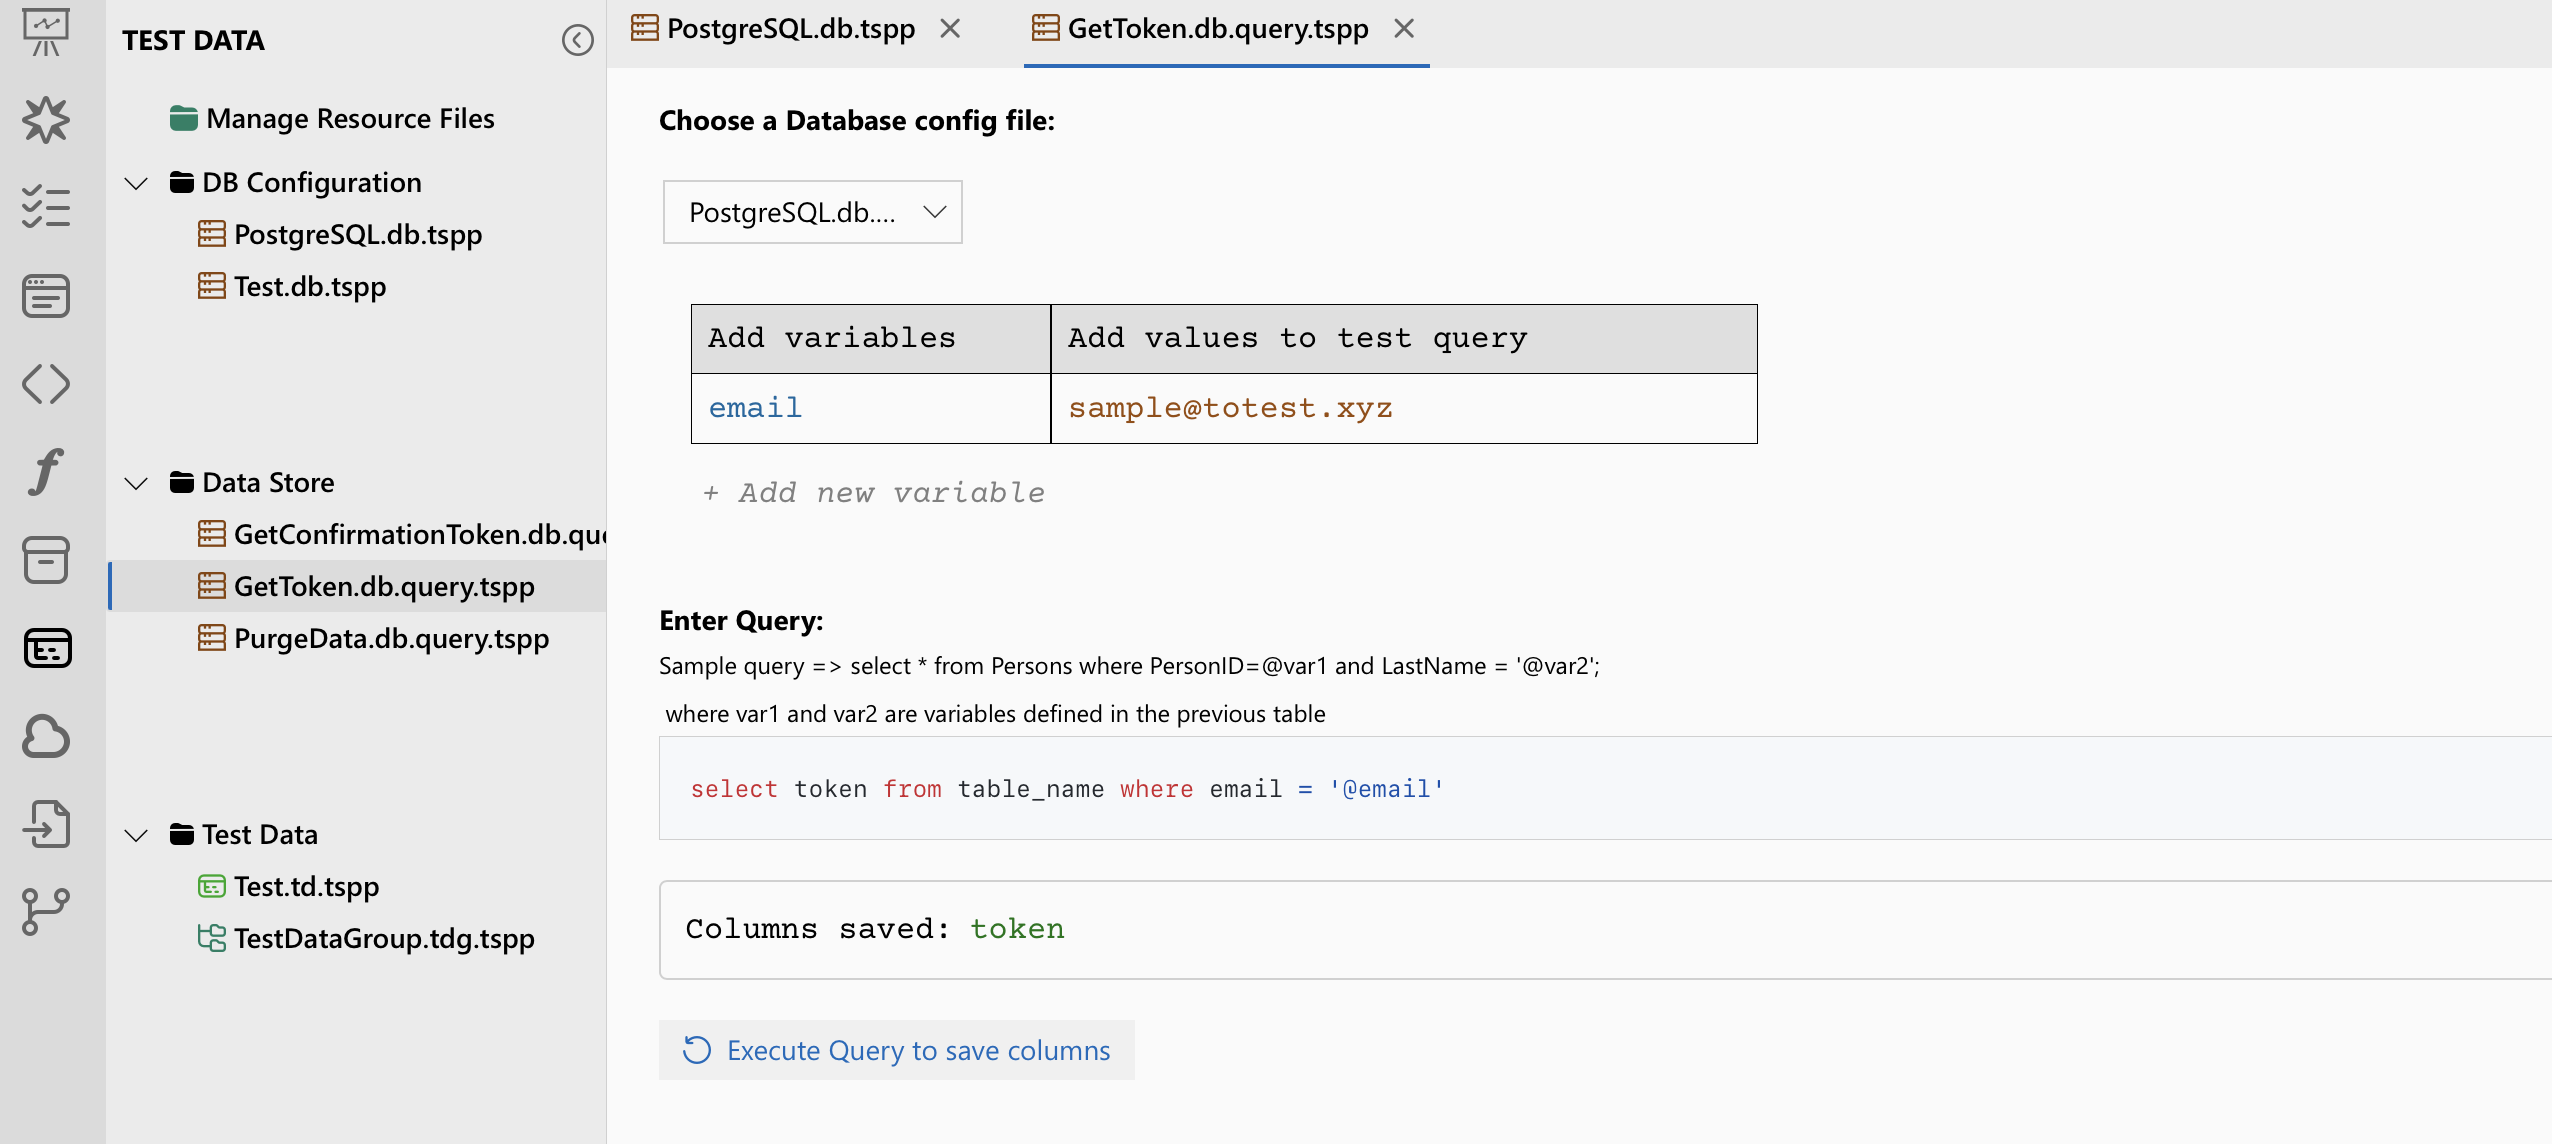
Create Database Queries - One time set up
The queries can be configured at the global level so that it can be used across multiple test scripts. These queries can also be parametrised for the dynamic data included in the query.
Follow the steps below, to create a database query -
- Go to the Test Data section in side navigation.
- Click on Add new icon that appears on hover over the Data Store.
- Choose New Database Query and provide a name for the query.
- Choose the Database config created in the previous step
- If the query requires dynamic values, you can incorporate variables as query parameters. Use the provided table to specify the variable name and its corresponding value. These values will be used within the WHERE clause of your query, as in the screenshot below.
- Once you have defined the query and any optional variables, click "Execute Query to save columns." This action retrieves the column structure from the database and saves it for future use.
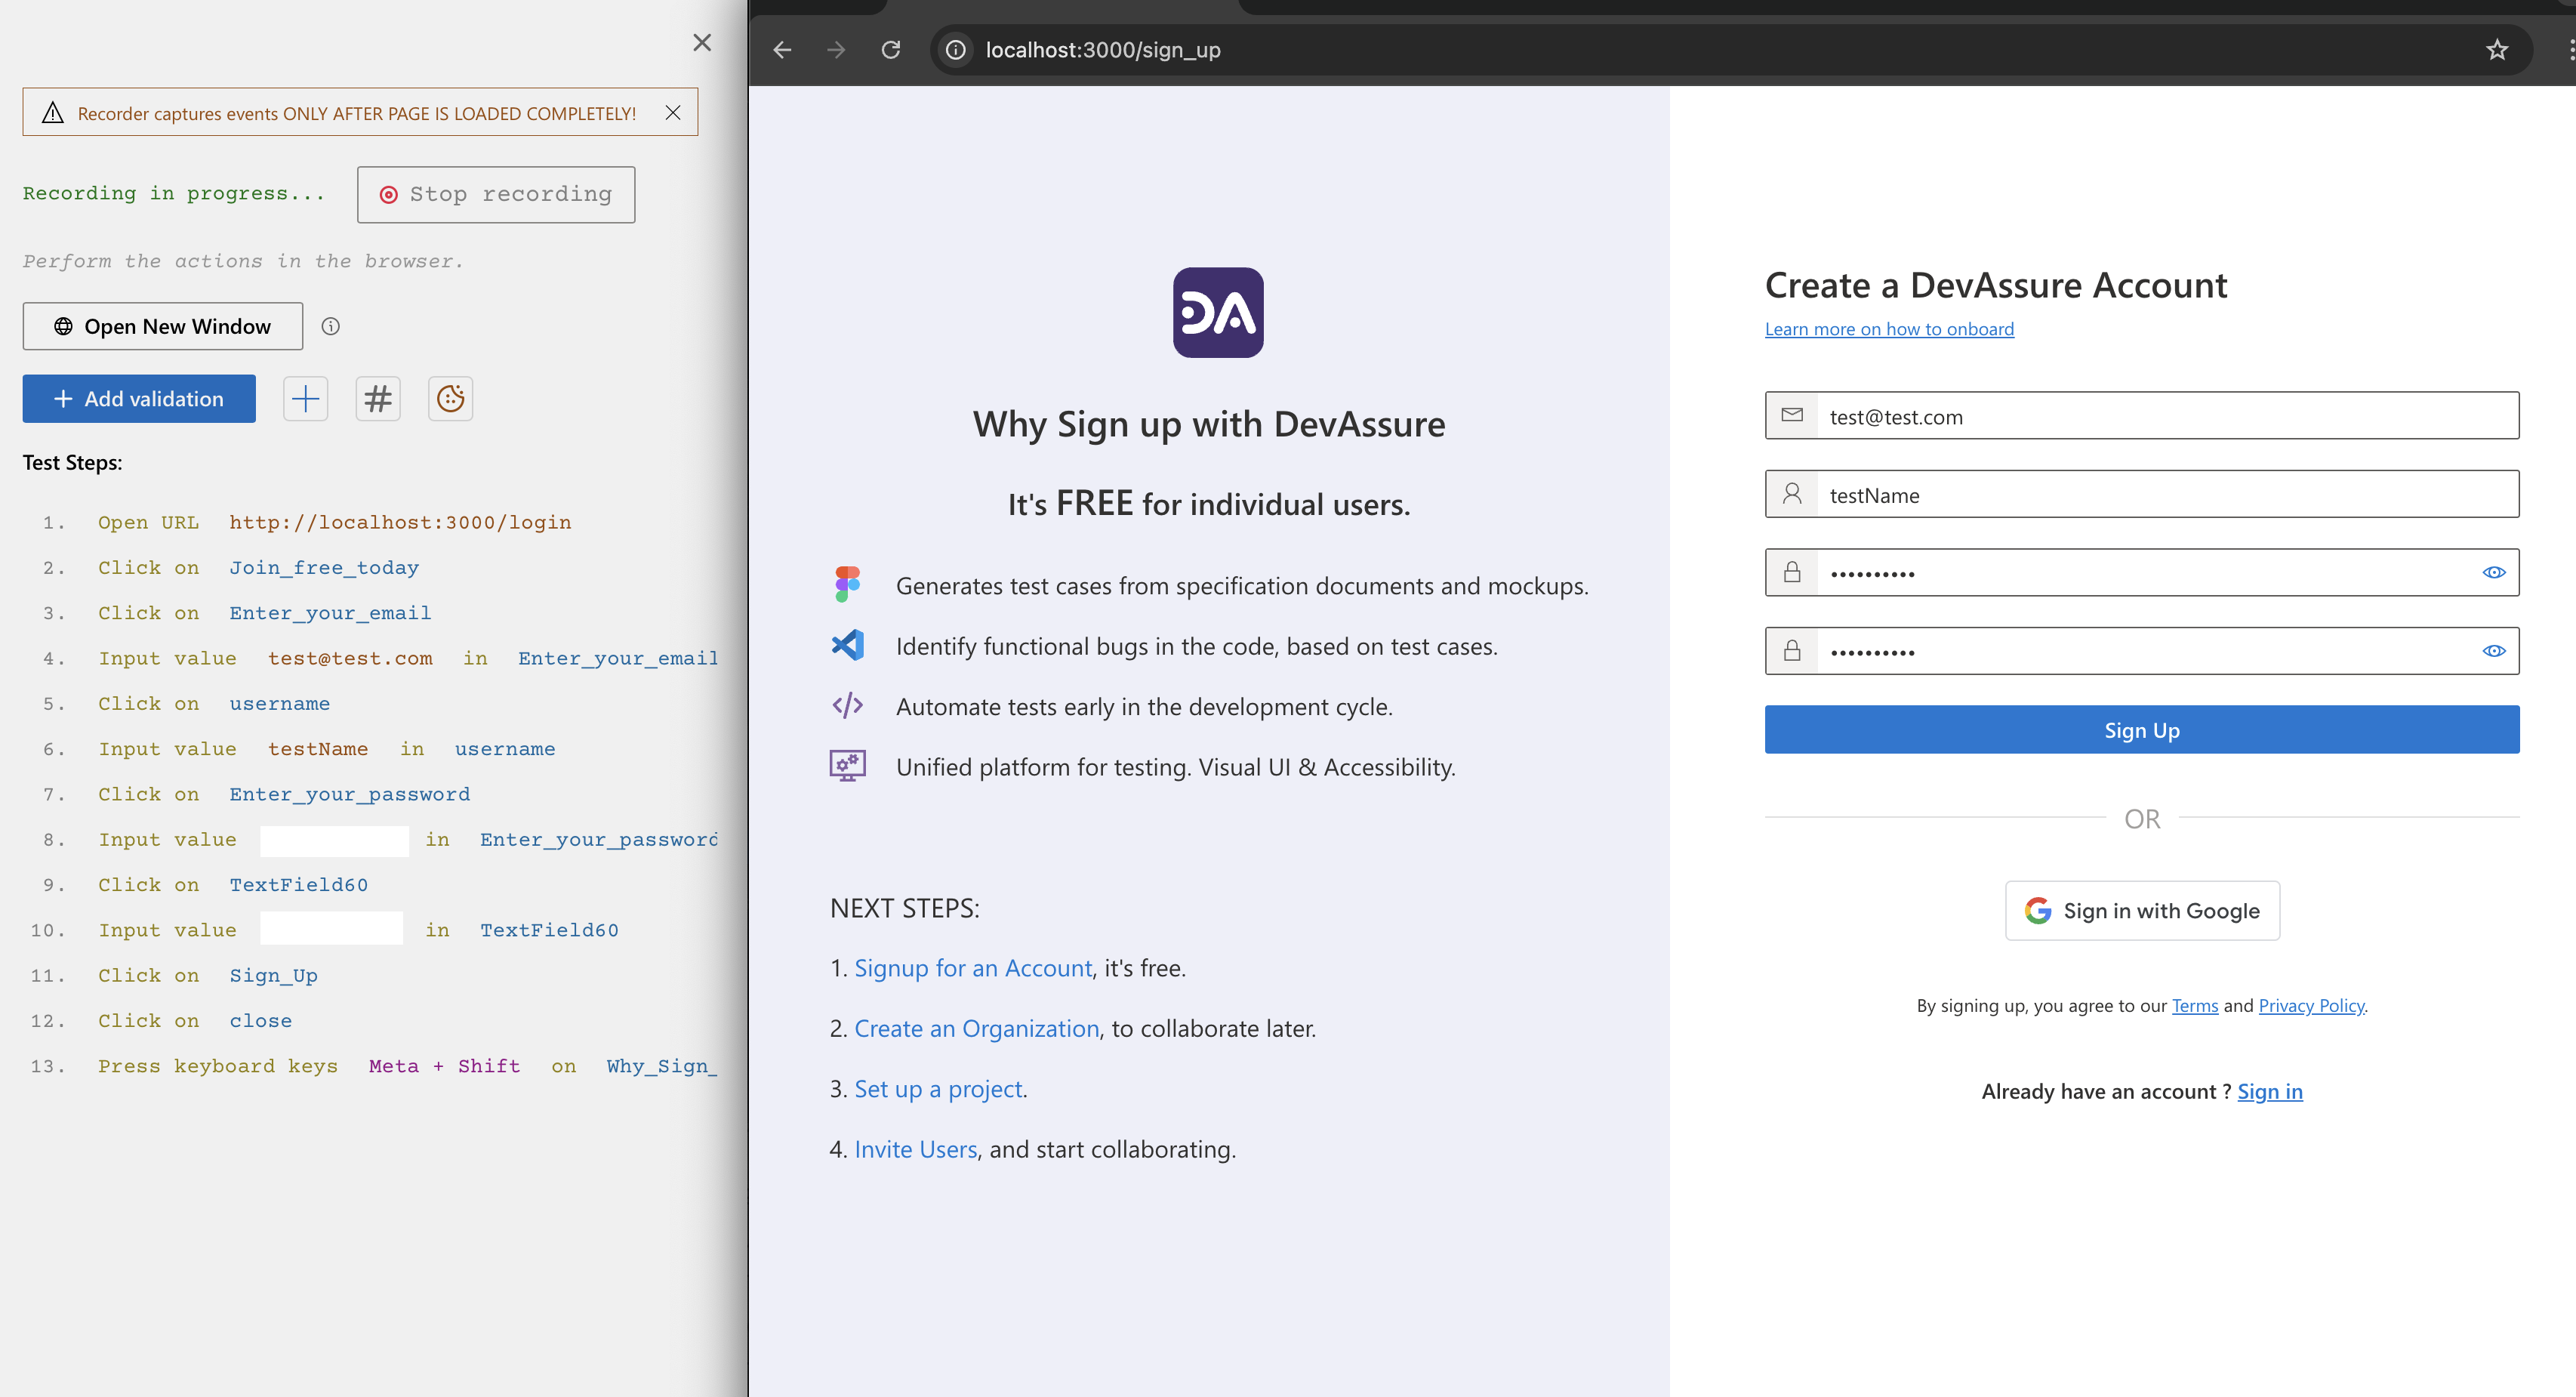
Record Test Case
- Create a new Web test case with DevAssure
- Click on Record Steps
Learn more about DevAssure's Intelligent Recorder
The recorder opens a browser and all actions performed within browser are captured by the recorder along with reliable element locators. The recorder uses the Page Object Model Framework to save the elements across different pages.
Learn how DevAssure improves test stability using BackUp Locators.
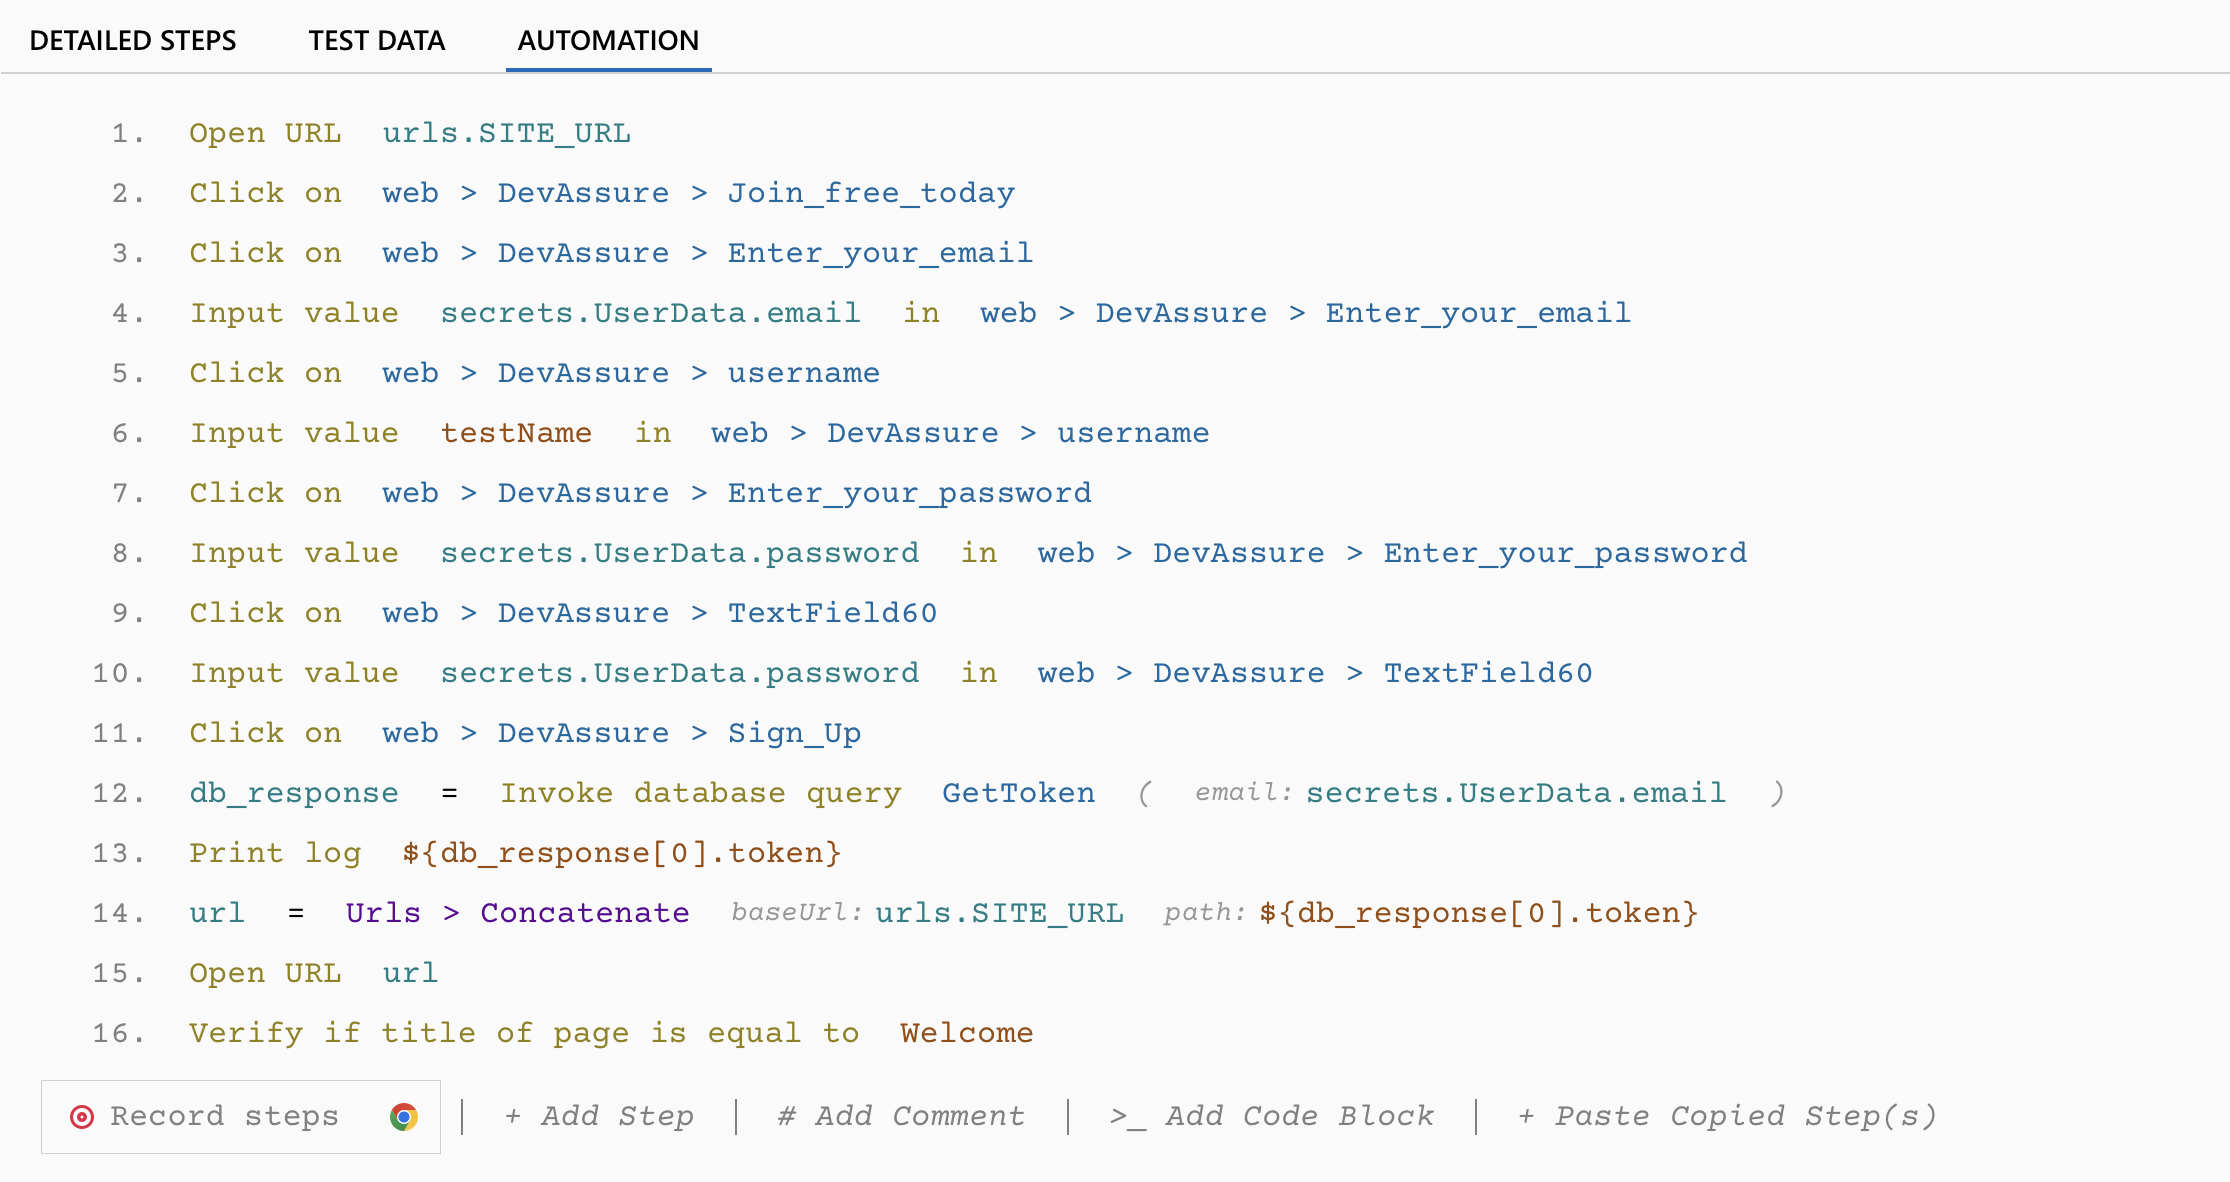
Add Database integration
DevAssure has a predefined set of actions, that can be used to add a database integration into the test script without a single line of code.
Here's the complete test script using DevAssure.
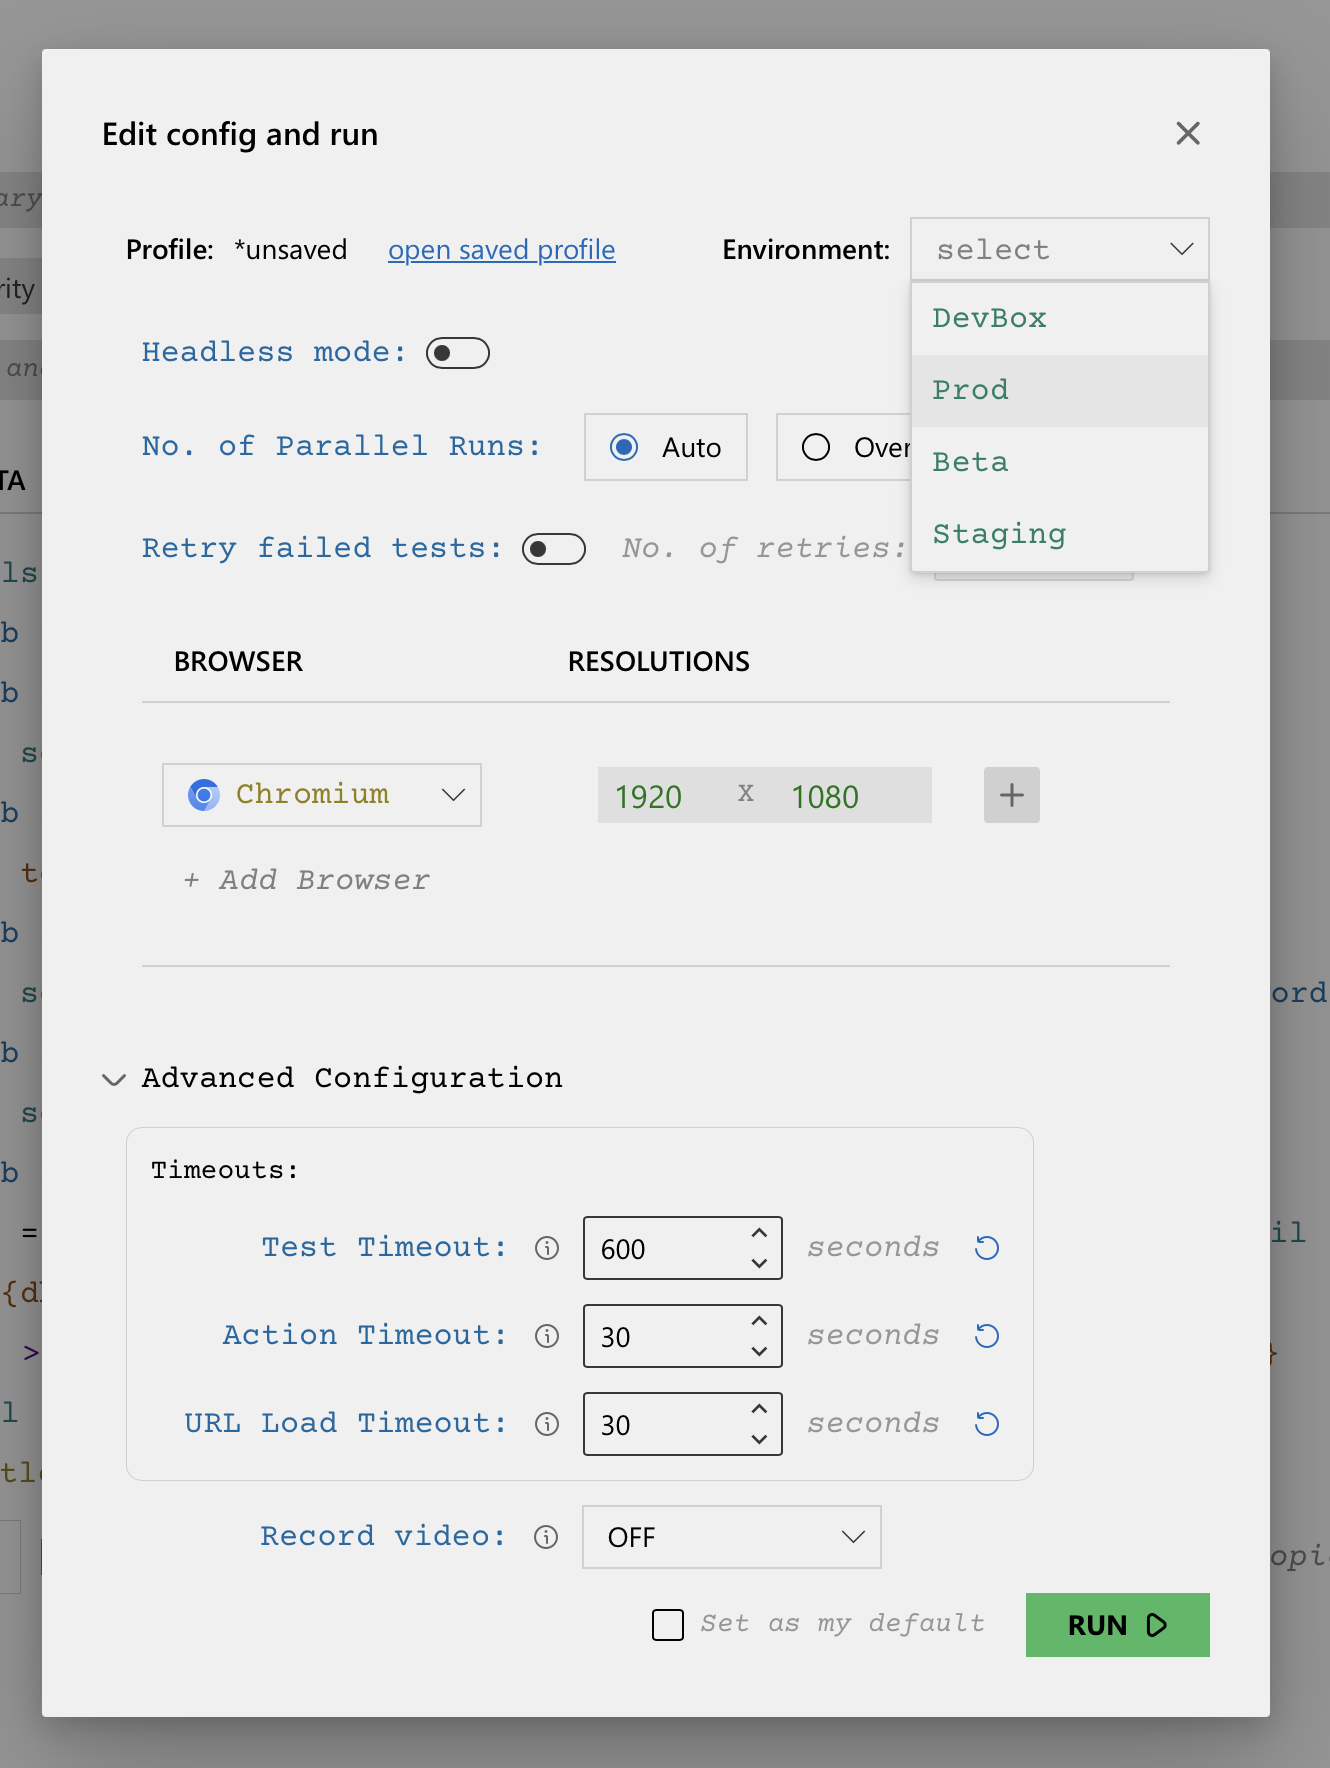
Test Execution
While executing tests, you can choose which environment you want to execute in, along with various other options as shown in the image below. Learn More
Conclusion
That's it, Your automation script is complete. With DevAssure you didnt have to
- Install any libraries
- Write a single line of code
- The first test would take 10 mins
- Since the configs are a one time set up, the next test will take 5 mins to complete automating.
DevAssure is that easy to use.
To experience how DevAssure simplifies test automation, sign up for a free trial.
🚀 See how DevAssure accelerates test automation, improves coverage, and reduces QA effort.
Ready to transform your testing process?