Visual Comparison Testing Graphs and Charts with Selenium Automation

Automated tests to validate graphs and charts are often tricky depending on the library used to generate the graphs and charts.
Identifying elements inside a graph and doing an attribute check will not give accurate results. The most reliable way to do automated testing of graphs and charts.
Visual comparison testing involves comparing the current snapshot of an application's UI with a base or benchmark snapshot of the same UI.
Apart from graphs and charts, this will ensure that there are no UI regression bugs, such as wrong color, font, spacing, alignment or any styling issues.
Additionally visual testing ensures that no content is lost or no additional content is included accidentally. Visual comparison testing is a layer of additional check on top of the functional validations.
This will ensure that the look and feel of the UI is intact and user experience is not affected.
There are different approaches to do automated visual testing,
- Pixel to pixel comparison of the image snapshots
- Comparing the HTML styles / CSS state
- Using image based LLM models like GPT4 Vision to identify differences in snapshots
This blog provides details on how to do visual comparison testing using pixel to pixel comparison approach with a working Selenium code
Step 1: Setup a Selenium project or open your existing Selenium automation project
I strongly recommend using your existing automation project to do visual comparison testing for multiple reasons. You can interleave visual comparison as a step in your existing functional tests. This will help you validate different states of the UI and you can do multiple visual validation for a single test. Also you can reuse the pages / elements declarations that are already created.
Step 2: Add util function to save base snapshot
Let's add a class VisualComparisonService to handle all visual testing validations. When the test runs for the first time, we need to store the current state as the base snapshot. To store a snapshot we need to take the label as an argument, all visualCompare method calls should have a unique label.
private void visualCompare(TakesScreenshot screenshotObj, String label, boolean optional) {
    File baseFile = new File("visual-compare-base/" + label + ".png");
    try {
        if(!baseFile.exists()) {
            System.out.println("File with label " + label + "is not present. Writing base snapshot!");
            this.saveBaseSnapshot((TakesScreenshot)screenshotObj, baseFile);
        }
    } catch (IOException e) {
        System.err.println("Error performing visual comparison");
        if(!optional) {
            Assert.fail("Error performing visual comparison", e);
        }
    }
}

private void saveBaseSnapshot(TakesScreenshot screenshotObj, File targetFile) throws IOException {
    FileHandler.createDir(new File("visual-compare-base")); //will be skipped if present
    File screen = ((TakesScreenshot)screenshotObj).getScreenshotAs(OutputType.FILE);
    FileHandler.copy(screen, targetFile);
}
All base snapshots are saved in the folder visual-compare-base. Include this folder as part of your repo to act as base snapshot for your CI runs
Step 3: Add ImageProcessor to compare images
Let's create a class ImageProcessor that will have a function to compare 2 images pixel to pixel. The first check would be to check the image dimensions. Only images with the same dimensions can be compared. If your tests will be run often with different resolutions and browsers, you should add the resolution and browser as part of the label, so each different context will have a unique base snapshot. Eg: trend_graph_1920x1080_chrome
BufferedImage baseImage = ImageIO.read(baseFile);
BufferedImage snapshot = ImageIO.read(snapshotFile);
BufferedImage resultImage = ImageIO.read(snapshotFile);
int w1 = baseImage.getWidth();
int w2 = snapshot.getWidth();
int h1 = baseImage.getHeight();
int h2 = snapshot.getHeight();
if (w1 != w2 || h1 != h2) {
    throw new IOException("Images are not of same dimensions. Base image: " + w1 + " x " + h1
    + ". Current snapshot: " + w2 + " x " + h2);
}
Step 4: Pixel to pixel comparison
For each pixel we can keep adding the difference to the sum and get the total difference between 2 images.Identifying the difference involves getting the RGB value of each pixel and adding the absolute difference of each value.
long diff = 0;
for (int j = 0; j < h1; j++) {
    for (int i = 0; i < w1; i++) {
        //Getting the RGB values of a pixel
        int pixel1 = baseImage.getRGB(i, j);
        Color color1 = new Color(pixel1, true);
        int r1 = color1.getRed();
        int g1 = color1.getGreen();
        int b1 = color1.getBlue();
        int pixel2 = snapshot.getRGB(i, j);
        Color color2 = new Color(pixel2, true);
        int r2 = color2.getRed();
        int g2 = color2.getGreen();
        int b2= color2.getBlue();
        //sum of differences of RGB values of the two images
        long data = Math.abs(r1-r2)+Math.abs(g1-g2)+ Math.abs(b1-b2);
    }
}
Step 5: Identify percentage difference and infer failure
Add a threshold value, any difference above this will be a failure. An optimal threshold for a web UI is 0.1, the threshold can be tuned based on the application and based on the dynamic components in the UI. Few trials will help arriving at the right value.
private static final double DEFAULT_THRESHOLD = 0.1;

System.out.println("Total pixel diff = " + diff);
double avg = diff/(w1*h1*3);
double percentage = (avg/255)*100;
System.out.println("Percentage difference between images = " + percentage);
saveResult(baseImage, snapshot, resultImage, label);
return percentage <= threshold;
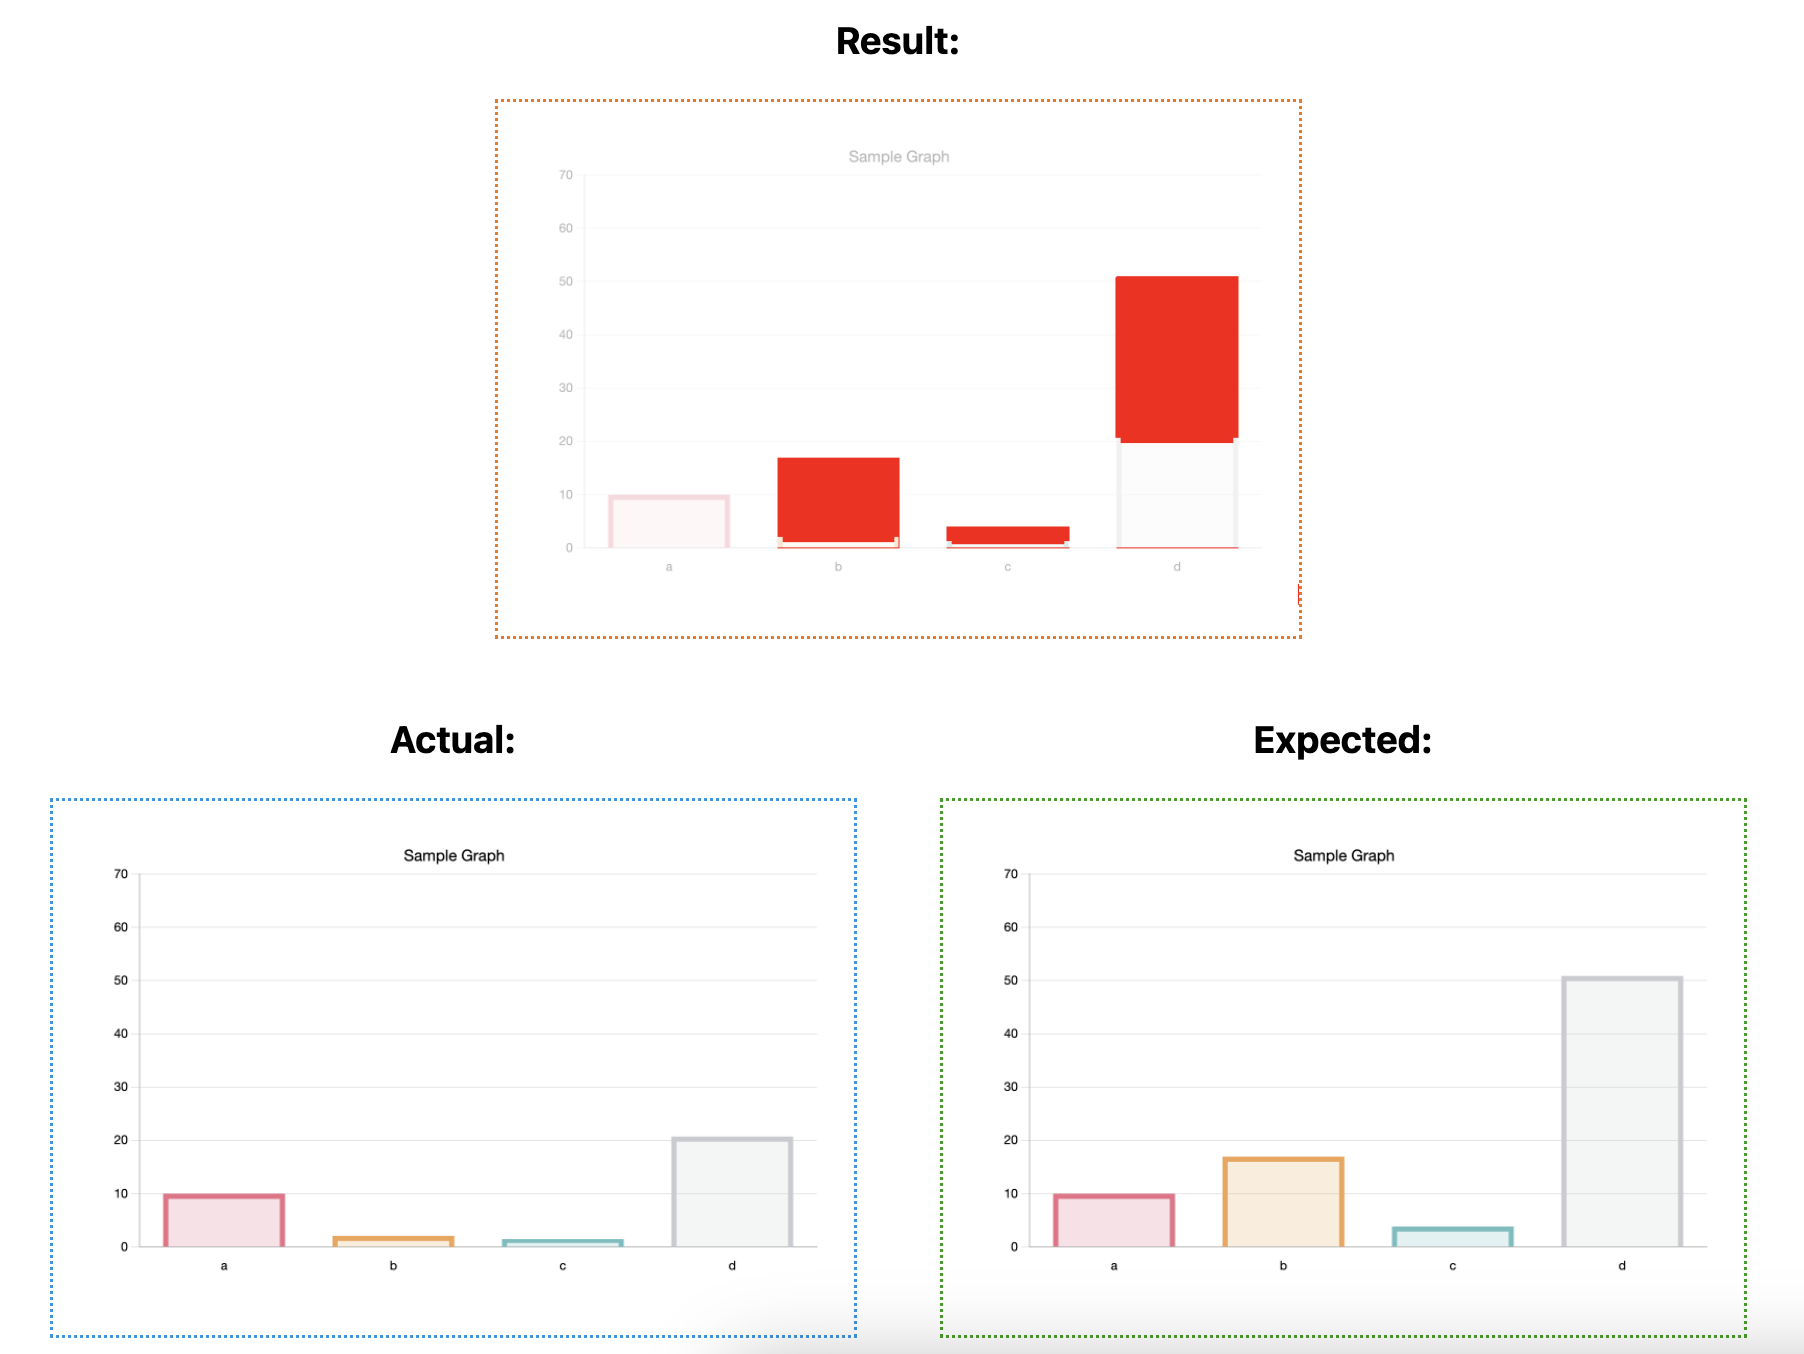
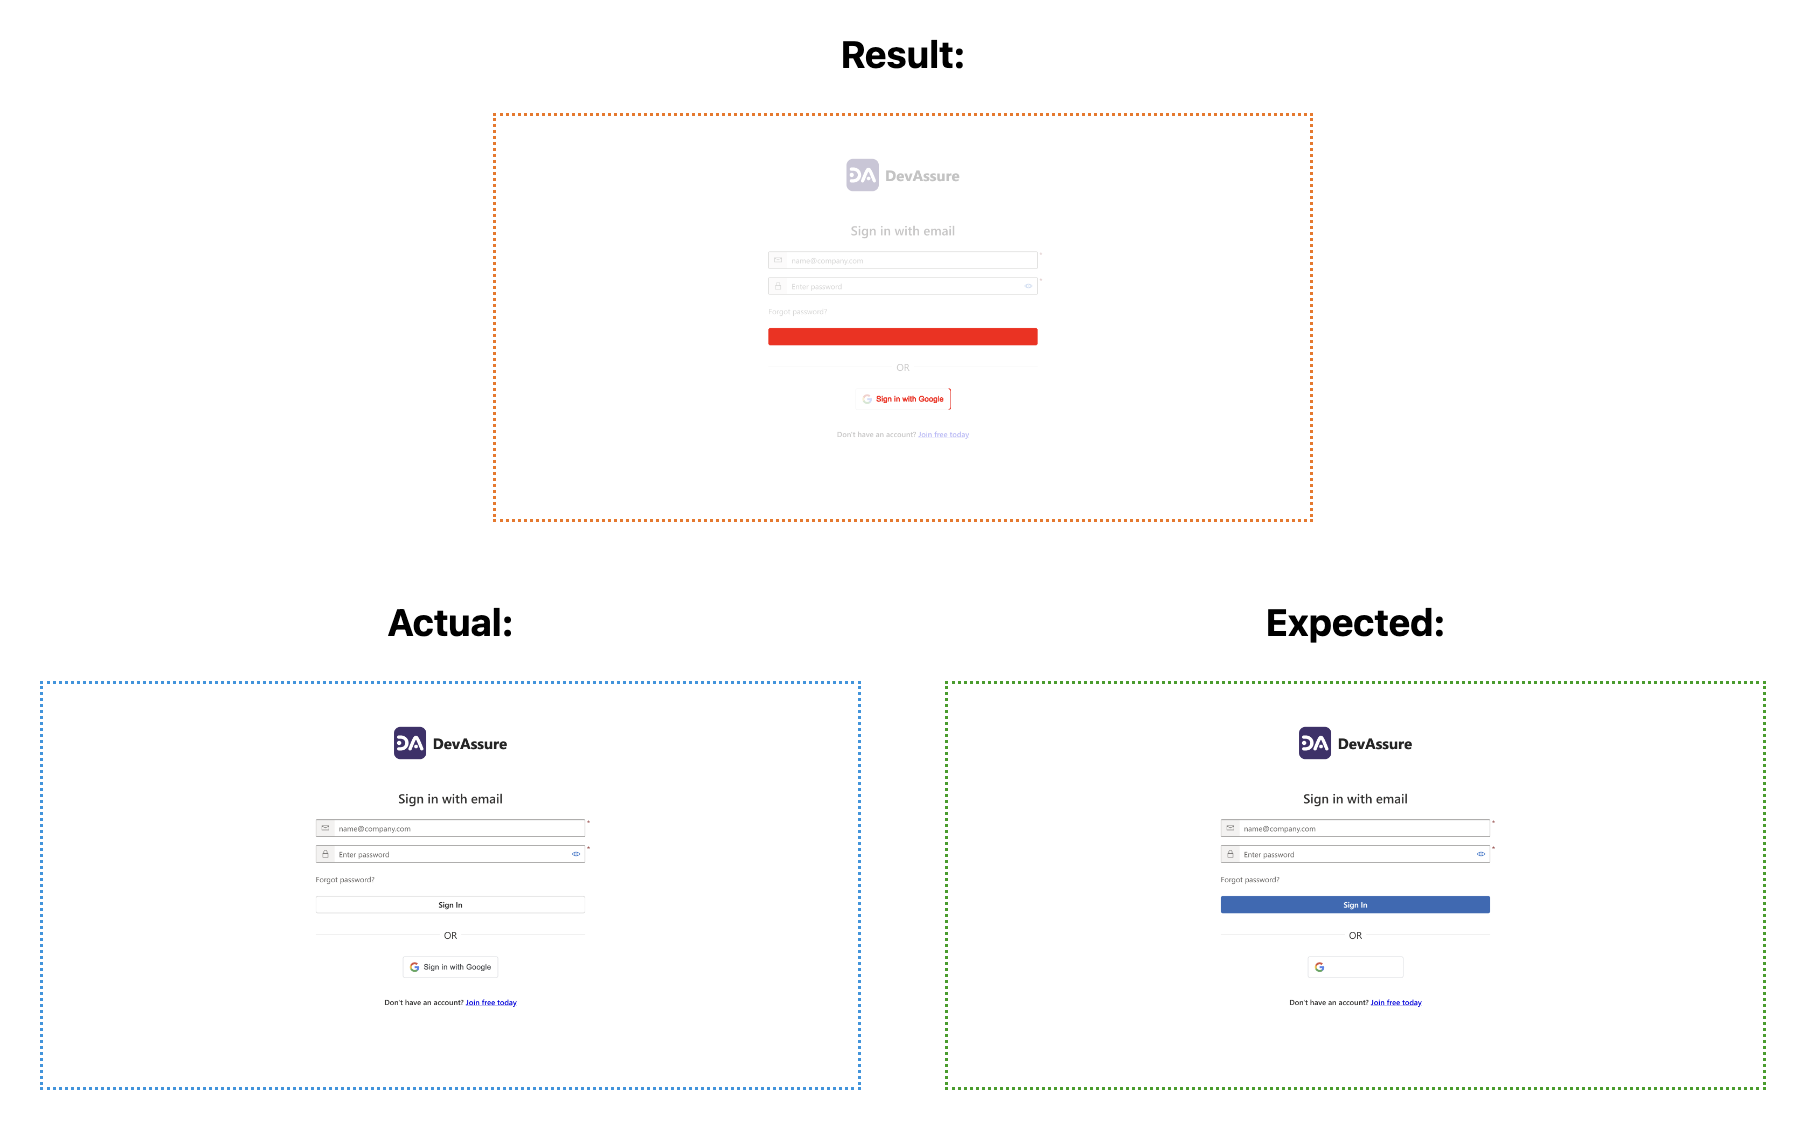
Step 6: Mark the non-matching pixels in the result image
To identify the deviations easily, make a copy of the current snapshot and mark the different pixels in the image. In the code below I've used red to mark the non matching pixels and reduce alpha of the other pixels, so that the error pixels stand out. You can use any color to distinctly highlight the errors.
for (int j = 0; j < h1; j++) {
    for (int i = 0; i < w1; i++) {
        //Above Code to find diff
        if(data != 0) {
            int modifiedRGB= new Color(255, 0, 0).getRGB();
            resultImage.setRGB(i, j, modifiedRGB);
        } else {
            Color color = new Color(resultImage.getRGB(i, j));
            Color newColor = new Color(color.getRed(), color.getGreen(), color.getBlue(), 70);
            resultImage.setRGB(i, j, newColor.getRGB());
        }
        diff = diff+data;
    }
}
Step 7: Wrapper functions to call compareImage for entire page / element
We can do a comparison for an entire page or only certain elements of the page. If there are dynamic content for which you want to skip the visual regression, you can pick only required elements and do visual comparison. If the visual comparison should not fail the test, mark the validation as optional. For mandatory checks, the function will fail the test.
public void visualComparePage(WebDriver driver, String label) {
    visualCompare((TakesScreenshot) driver, label, false);
}


public void visualCompareElement(WebElement element, String label) {
    visualCompare((TakesScreenshot) element, label, false);
}


public void visualComparePage(WebDriver driver, String label, boolean optional) {
    visualCompare((TakesScreenshot) driver, label, optional);
}


public void visualCompareElement(WebElement element, String label, boolean optional) {
    visualCompare((TakesScreenshot) element, label, optional);
}

private void visualCompare(TakesScreenshot screenshotObj, String label, boolean optional) {
    File baseFile = new File("visual-compare-base/" + label + ".png");
    try {
        if(!baseFile.exists()) {
            System.out.println("File with label " + label + "is not present. Writing base snapshot!");
            this.saveBaseSnapshot((TakesScreenshot)screenshotObj, baseFile);
        } else {
            File screen = ((TakesScreenshot)screenshotObj).getScreenshotAs(OutputType.FILE);
            boolean result = ImageProcessor.compareImages(baseFile, screen, label);
            if(!result && !optional) {
                Assert.fail("Visual comparison Failed! The current snapshot is deviating from base the base snapshot for label " + label);
            } else if(result) {
                System.out.println("Visual comparison passed! Label: " + label);
            } else {
                System.out.println("Visual comparison failed! Skipping optional check. Label: " + label);
            }
        }
    } catch (IOException e) {
        System.err.println("Error performing visual comparison");
        if(!optional) {
            Assert.fail("Error performing visual comparison", e);
        }
    }
}
Step 8: Add a custom HTML report to visualise the results or include the result image to your existing reports.
Sample HTML Report template is avaialbe here - Sample Report
Sample report for single bar chart element:
Sample report for entire page:
The full working code is available here for reference - visual-testing-demo git repo
Visual comparison can be done in a single click in DevAssure. Checkout Visual Testing in DevAssure

Frequently Asked Questions (FAQs)
Visual comparison testing involves capturing UI screenshots during automated test execution and comparing them pixel-by-pixel against baseline images to detect visual differences. It ensures that the UI's look and feel, layout, colors, fonts, and alignment remain consistent, catching regressions that functional tests may miss.